User Manual
Professional 3D packaging pipeline — Illustrator to PBR
Version 2.7.0 · 2026
Contents
1. Introduction
Easy Label Forge connects Adobe Illustrator packaging artwork to production-ready 3D materials. The workflow is: prepare your .ai file → define masks and ROIs → preview on 3D geometry → export PBR textures or send a live bridge to Blender, Cinema 4D, or Houdini.
Main workspace tabs
- Mask Designer — 2D canvas, ROIs, layer groups, shape tools.
- Preview Projection — OpenGL viewport; planar, cylindrical, or Smart UV; planar front-face option.
- Shader Studio — 2.7 presets, gallery, advanced effects, layer order, export / DCC launch.
- Setup / Plugins — corner button (top right): DCC paths, add-on install, preferences.
What's new in version 2.7.0
This release expands Shader Studio and keeps exports aligned with Blender, Cinema 4D, and Houdini.
- Material preset gallery — 18 built-in presets (metals, plastics, varnishes, soft touch, foils, LED zones, cardboard/plastic bases) with a visual grid and dropdown.
- Base vs masks — label artwork stays on the base layer; masks define where foils, varnish, or effects appear, each with its own material (diffuse tint).
- Advanced effects — sheen (soft touch), iridescent thin film (IOR, thickness in nm), emission (color + strength 0–100, 0 = off).
- Layer order — up/down arrows in Shader Studio; order is preserved on export and in DCC bridges (recipe 1.6).
- Use label artwork on mask — optionally reuse
base.pngon a mask instead of a flat color. - Planar preview — Front face only checkbox to project only the product's front face.
- Installer — optional task to auto-install Blender, Houdini, and Cinema 4D bridge add-ons.
2. Installation & first launch
- Run
Setup_EasyLabelForge_v2.7.1.exeand follow the installer. - When offered, enable Install Blender, Houdini, and Cinema 4D plugins for automatic add-on deployment (or install later from Setup / Plugins).
- Launch Easy Label Forge from the Start menu or desktop shortcut.
- On first run, open Setup / Plugins and set paths to your DCC executables (Blender required for Smart UV).
- Optional: public builds often bundle Gumroad product IDs; for custom builds, copy
gumroad_product_ids.example.jsontogumroad_product_ids.jsonnext to the executable (seeREADME_LICENSE.txt).
3. License & activation
Purchases are delivered through Gumroad. After buying, use Help → License in the app.
Activate on this machine
- Open Help → License.
- Paste your Gumroad license key and click Verify.
- If seat activation is enabled, the app registers this PC and shows Seats: x/y in the status bar.
Deactivate
- Deactivate this machine — frees one seat on your plan (Indie Plus / Studio).
- Remove license entirely — clears local license data on this PC.
Export limits by tier
| Mode / tier | Max export (longest side) | Watermark on textures |
|---|---|---|
| No license (evaluation) | 2048 px | Yes |
| Indie, Lifetime | 4096 px (4K) | No |
| Indie Plus, Studio Core, Studio Pro | 8192 px (8K) | No |
Resolution is chosen in Shader Studio; values above your tier are clamped automatically at export.
Full product matrix: easylabelforge.com → Licensing details, or docs/LICENSE_PRODUCT_MATRIX.md in the developer package.
4. Setup — plugins & DCC paths
Open Setup / Plugins (corner button). Configure executable paths and install bridge add-ons into each DCC.
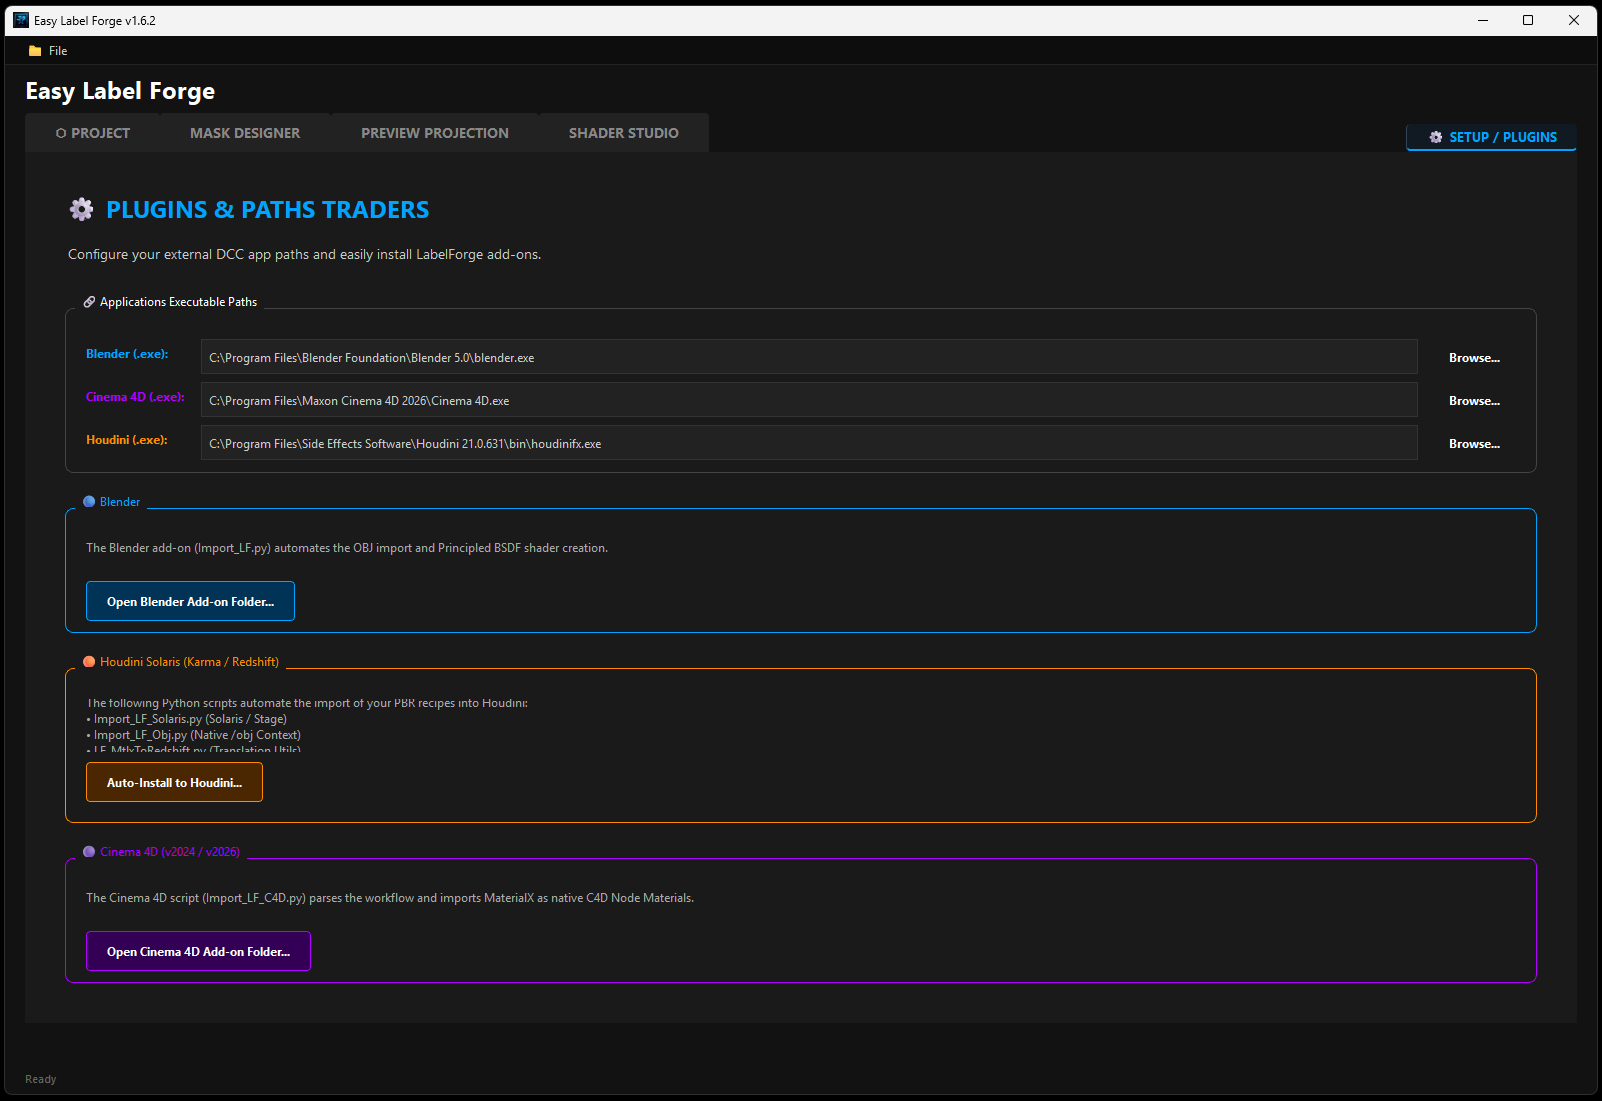
Application paths
- Blender (required for Smart UV / box unwrap) — path to
blender.exe. - Cinema 4D (optional) — enables C4D bridge export.
- Houdini (optional) — enables Solaris / MaterialX bridge.
Preferences
Under Application preferences, you can disable the reminder dialog when opening .ai files (PDF compatibility hint). Recommended for experienced users only.
Installing add-ons
Use the install buttons in each DCC section to copy the bundled add-on into the detected scripts folder. Restart the target application after installation.
5. Illustrator file requirements
Prepare artwork in Adobe Illustrator before import.
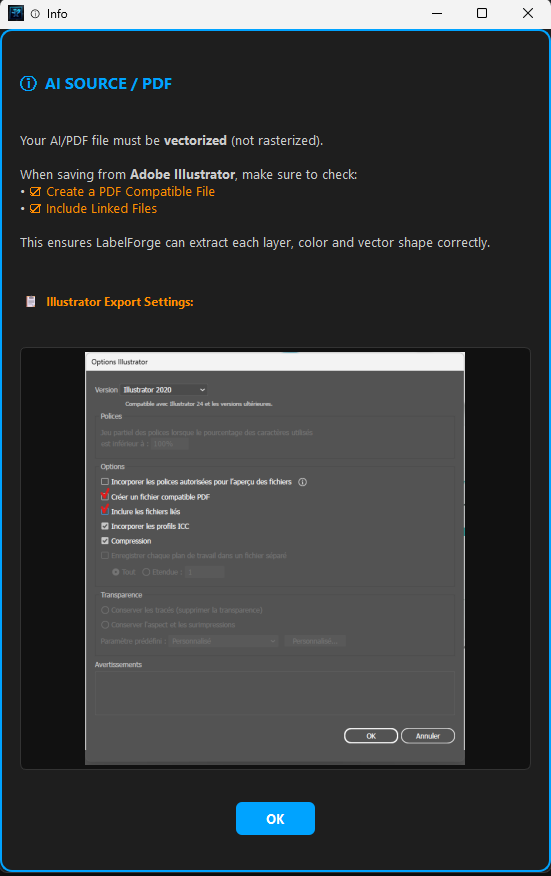
- Vectorize text — Type → Create Outlines on all live text.
- Die-cut layer — name cut/dieline layer or folder
LF_CUTfor Smart UV. - Layer structure — separate foils, varnishes, and base art for accurate PBR assignment.
- Prefer current Illustrator versions; avoid legacy formats without PDF compatibility.
6. Projects & loading artwork
Create or open a project from the home / project panel: choose your .ai or .pdf file and a project folder name.
- Load / browse — select vector artwork; a reminder may appear for
.aiPDF compatibility. - Drag and drop — drop a file onto the drop zone when available.
- LabelForge parses layers, colors, and embedded assets in the background; progress appears in the status bar.
Project data (ROIs, groups, paths) is stored alongside your chosen project directory for later sessions.
7. Mask Designer
The Mask Designer maps 2D artwork regions to 3D products using ROIs, guides, and layer groups.
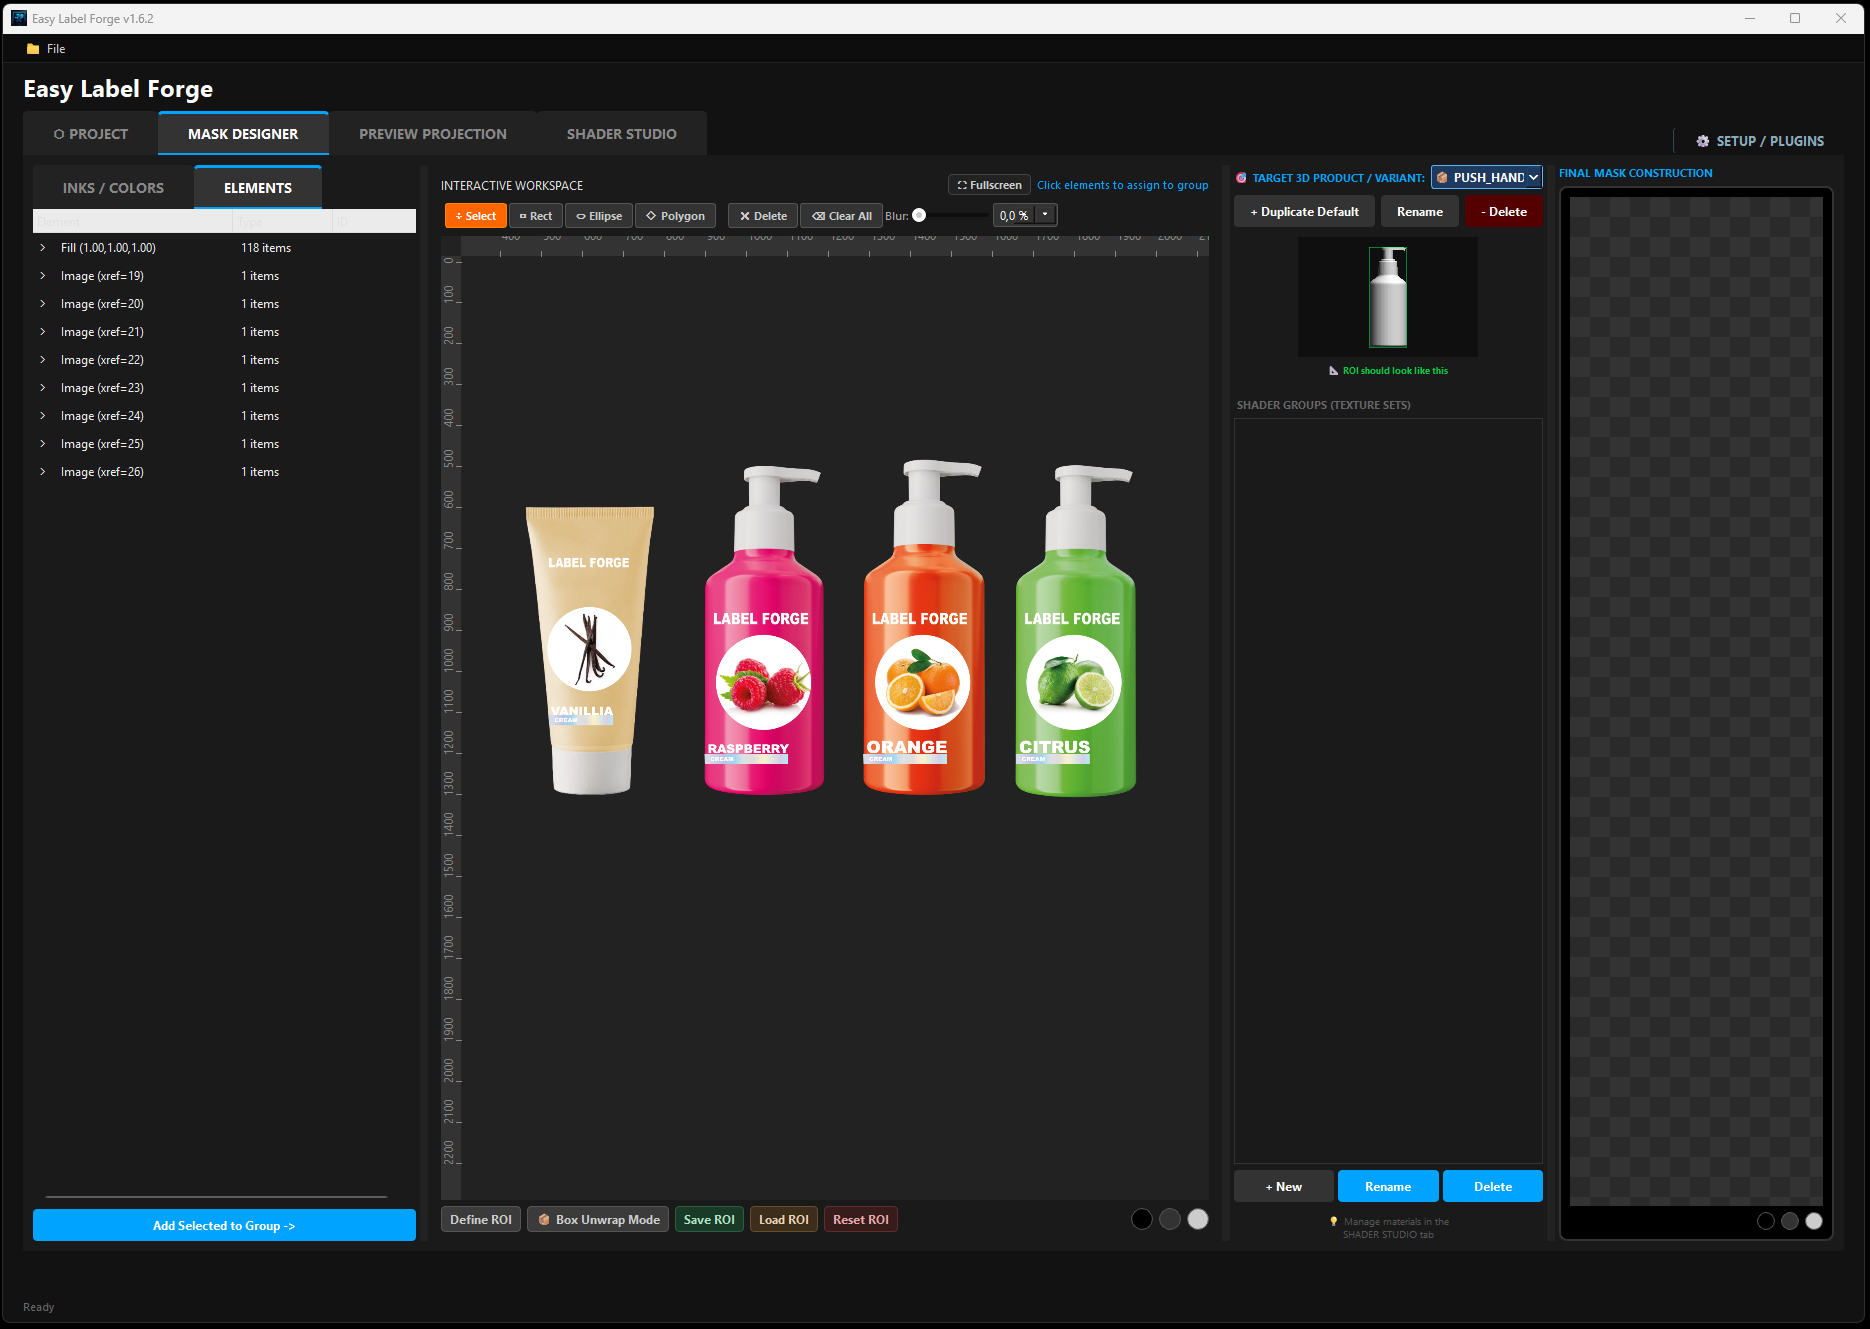
Canvas & guides
- Pan / zoom on the central canvas; drag from rulers to create guides (hold Ctrl to move guides).
- Right-side panels: Target 3D, ROIs, and Groups (layer hierarchy from Illustrator).
ROIs (regions of interest)
- Draw ROI rectangles to isolate each label on the sheet.
- Multiple ROIs supported; snapping aligns to guides.
Shape tools
- Rectangle, ellipse, polygon for custom masks; Ctrl while drawing subtracts from existing shapes.
- Arrow keys nudge; Shift+Arrow for larger steps; Ctrl+Z undo.
Layer groups & Advanced panel
Assign Illustrator layers to metallic, varnish, emboss, or base color channels via the Groups panel. Use the collapsible Advanced area for the element tree and ink list.
8. Preview Projection
The Preview Projection tab displays your mesh with live texture projection.
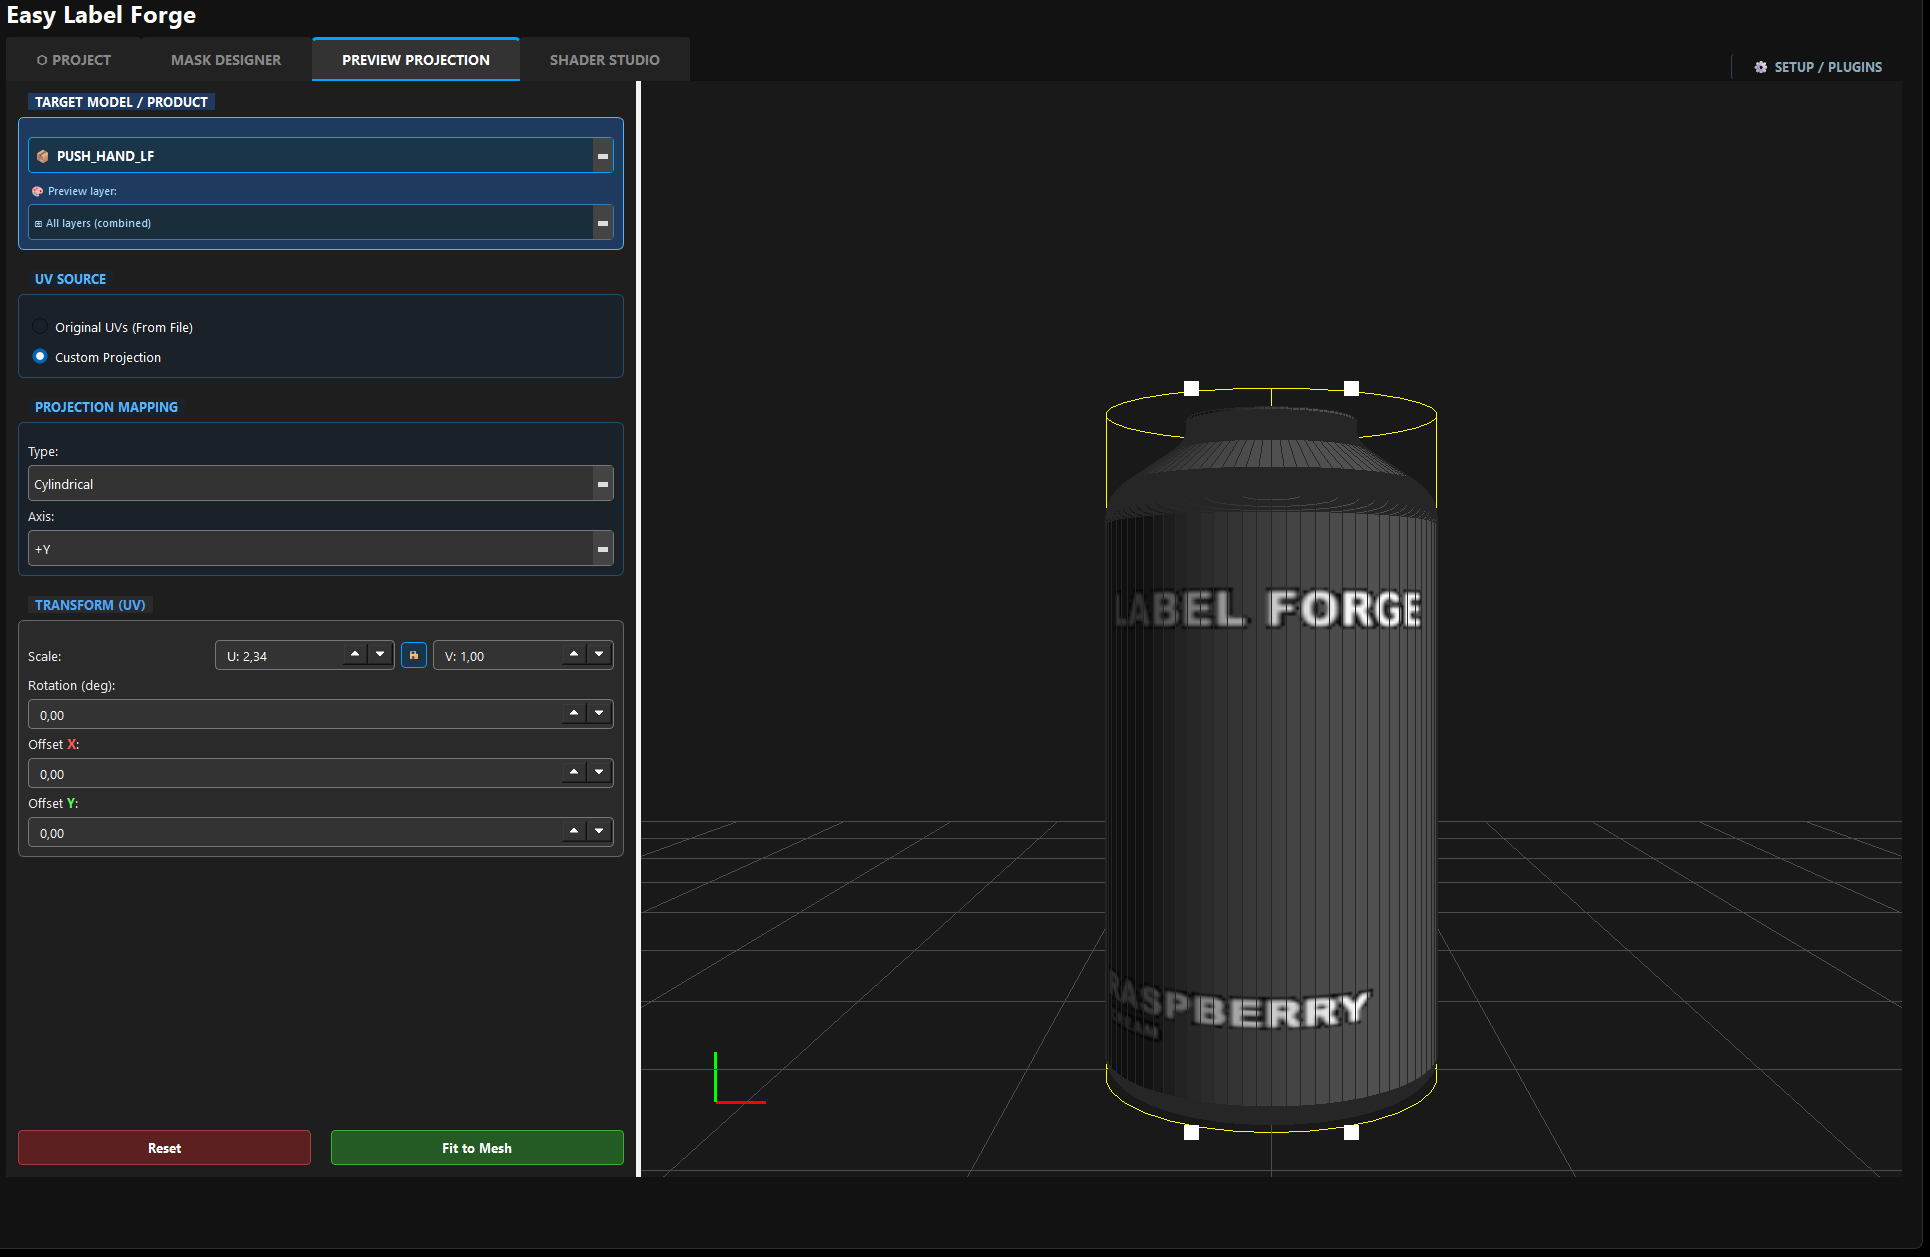
Loading geometry
Import an .obj (or supported mesh) representing your product. Thumbnails help pick variants when configured.
Projection modes
- Planar — projects along X, Y, or Z; best for flat panels.
- Cylindrical — wraps 360°; circumference is computed to reduce stretching.
- Smart UV (unwrap) — uses Blender with
LF_CUTdielines to build a box UV layout.
Planar projection — front face
In Planar mode, Front face only (on by default) limits projection to the mesh front face so artwork is not stretched onto sides or the back of the product.
In Unwrap_uv mode, the Front →R→B→L selector defines which box face is treated as the front for Smart UV alignment.
9. Shader Studio & export
Assign materials per layer, use 2.7 presets, then export or launch a DCC bridge.
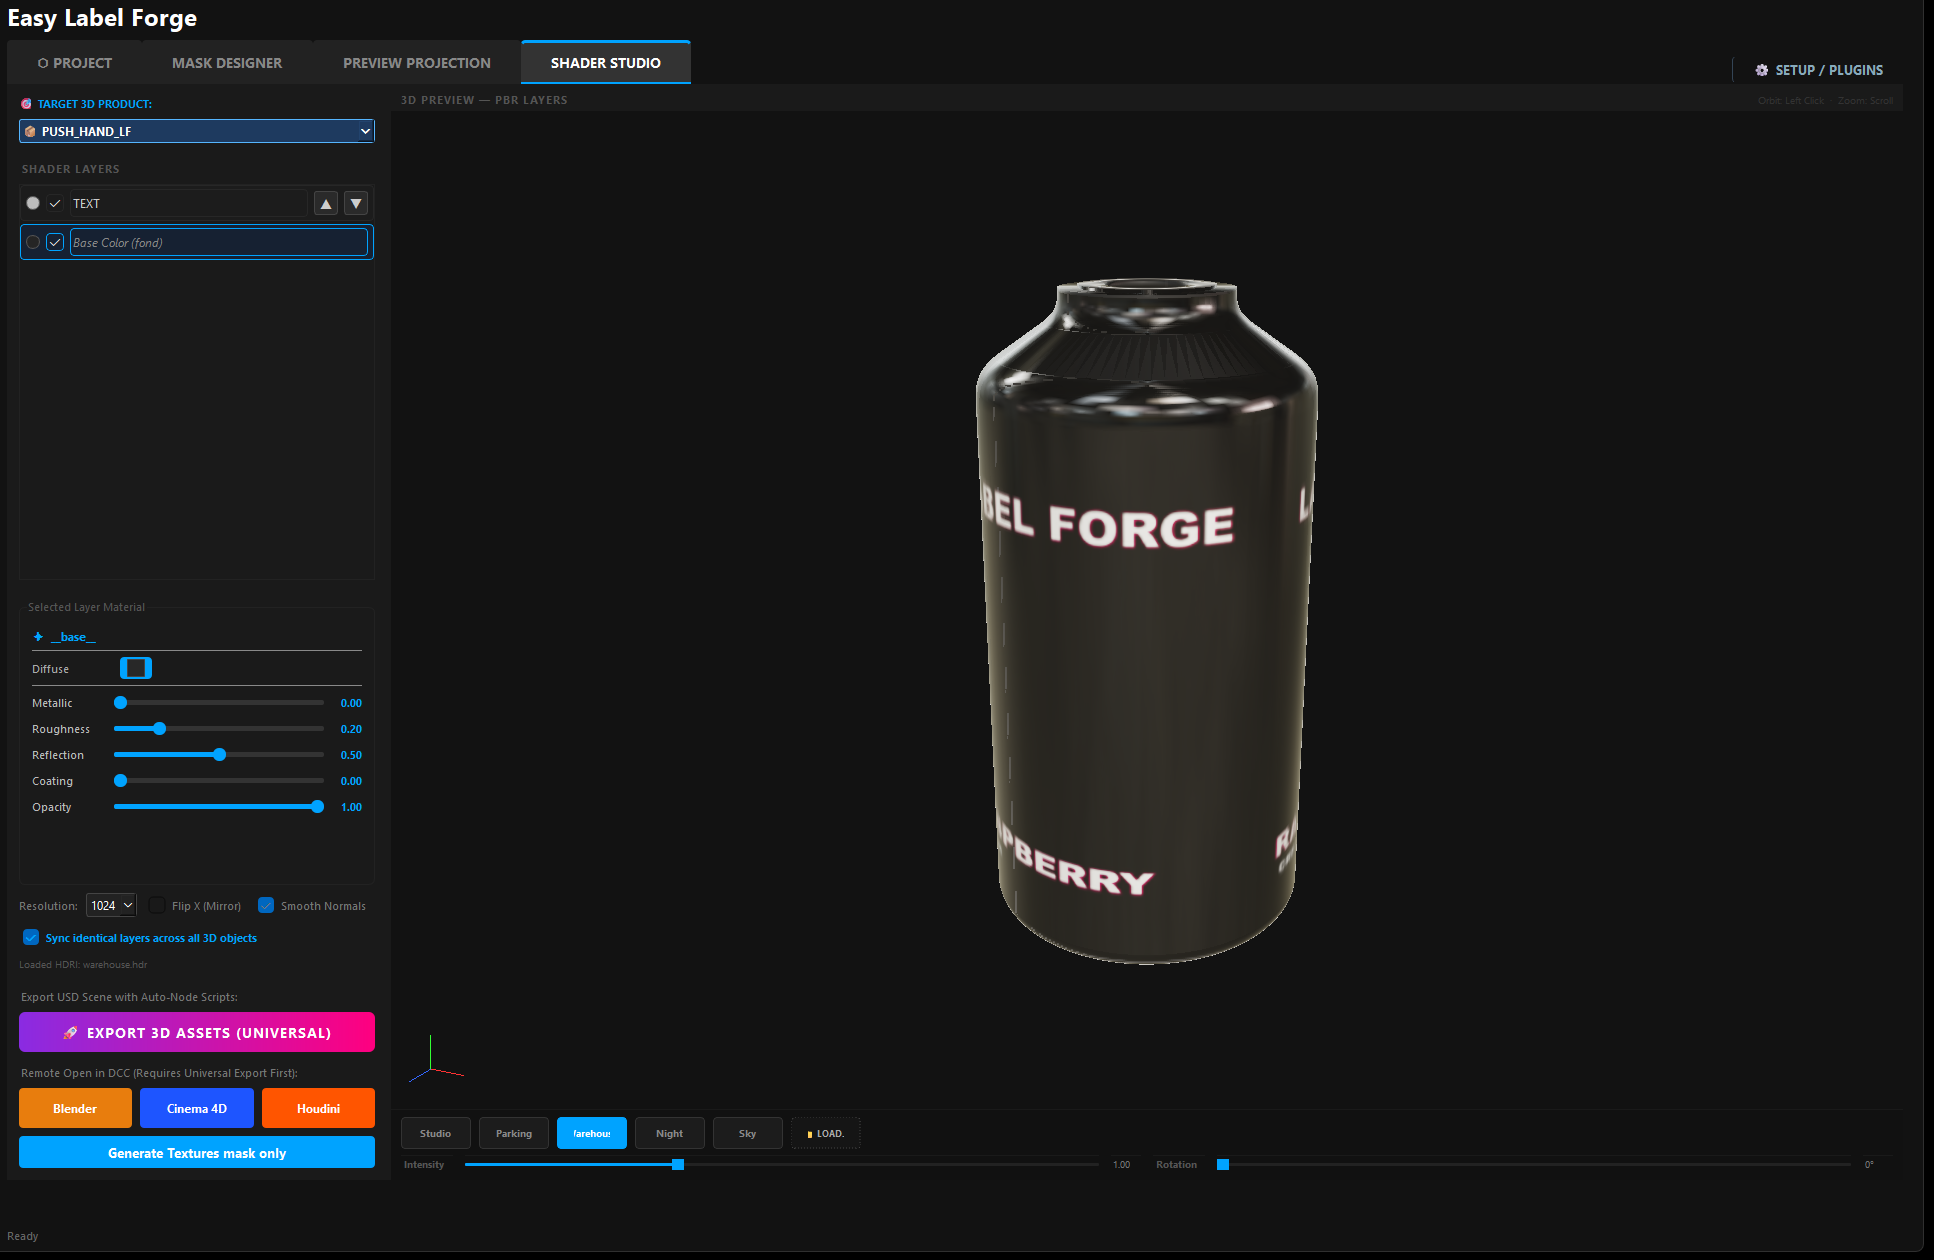
Base + mask material model (v2.7)
- Base layer — carries main label artwork (
base.png): cardboard, plastic, glossy, or neutral finishes. Pick a base preset or tune metallic, roughness, reflection, and coating manually. - Mask layers — each foil / varnish / effect group has its mask and material. The mask defines where; diffuse color tints the PBR look (not full artwork unless you enable label reuse).
- Use label artwork — per-mask option to sample
base.pngin that region (e.g. printed areas under varnish).
Presets & gallery
- Preset dropdown — applies diffuse + PBR to the active layer (base or mask) immediately.
- Gallery button — visual grid; click a swatch to apply. Thumbnails ship with the build when included in resources.
- 14 mask presets — bright/satin metal, warm gold, cool silver, glossy/satin plastic, matte opaque, gloss/satin varnish, soft touch, holographic foil, iridescent varnish, white/color LED zones, subtle security iridescent strip.
- 4 base presets — cardboard, plastic, glossy, neutral.
Advanced panel (per layer)
- Reflection / Coating — specular and clear-coat style layer (mapped in Blender Principled BSDF).
- Sheen — soft-touch style finish (sheen + sheen roughness).
- Thin film — iridescence: IOR, thickness (nm), weight. Supported in the Blender bridge; ELF UI preview is approximate.
- Emission — color and strength 0–100 (0 = off). LED presets use moderate values suited to preview and DCC import.
Layer order
Use ▲ / ▼ next to the layer list. The top row in Shader Studio stacks above others in export. Order is stored in Label_Recipe.json as shader_layers_order (recipe 1.6+) for Blender, Houdini, and Cinema 4D.
Channels & export
- Base color / Metallic / Roughness / Opacity — standard PBR workflow unchanged.
- Generate textures (mask only) — square mask outputs; watermark in evaluation mode.
- Export 3D assets / universal textures — full PBR set at selected resolution (tier: 2048 / 4K / 8K).
- DCC bridge — sends textures + recipe to the DCC configured in Setup.
10. DCC bridges (Blender, Cinema 4D, Houdini)
Bridges read Label_Recipe.json (1.6+): layer order, reflection/coating, sheen, thin film, emission, and per-mask use_label_artwork.
Blender
Required for Smart UV and background geometry. The import_LF add-on stacks masks using shader_layers_order and maps Principled BSDF (specular, coat, sheen, thin film, emission). Restart Blender after installing from Setup.
Cinema 4D
Optional. Bridge recreates materials in the active C4D version when a valid executable path is set; advanced fields follow the exported recipe.
Houdini
Optional. Solaris / MaterialX import places textures and layer properties on USD materials; suited to Solaris/Karma pipelines.
11. Troubleshooting
| Issue | What to try |
|---|---|
.ai won't parse | Re-save with Create PDF Compatible File; expand text to outlines. |
| Export resolution lower than selected | Check license tier; evaluation is capped at 2048 px. |
| Watermark on exports | Verify Gumroad license in Help → License. |
| Seats full | Deactivate an old machine from Help → License, or use Studio pool rules. |
| Blender / bridge fails | Confirm blender.exe path in Setup; install add-on; restart Blender. |
| 8K export very slow | Expected for large ROIs; ensure disk space in temp export folder. |
| Preset gallery shows flat color swatches | Normal if thumbnail PNGs are not bundled; presets still work via the dropdown. Use a full build or contact support. |
| Thin film looks different in ELF vs Blender | ELF preview is approximate; verify in Blender after bridge. Use Blender 4.2+ for Principled thin film. |
| Wrong layer stack in DCC | Re-export after reordering layers; check shader_layers_order in the recipe JSON. |
| DCC add-ons missing after install | Re-run installer with the plugin task, or EasyLabelForge_v2.7.0.exe --install-dcc-plugins from the install folder. |